
With the Fiks platform, the municipal sector can communicate across administrative levels and national specialist sectors—contributing key building blocks to the national ecosystem for digital collaboration. The Fiks platform is a central, shared service platform for Norwegian municipalities and county councils. It consists of common components and digital services, providing suppliers with a framework to adhere to as a standard for the municipal sector. This supports their ability to scale and reuse solutions across municipalities.
KS Fiks paves the way for integrated user management, a capability that Identum eADM has utilised. When new users are added, or existing users are modified or deleted in eADM, the integration will automatically update KS Fiks. The integration also enables the use of groups for access management. It is possible to grant one or more groups access to a service, and subsequently add or remove individuals from this group in eADM—either automatically based on rules or manually, for example, by managers.
Another key benefit is that when a person leaves or no longer has a professional requirement for access, eADM will automatically revoke the user's access rights. This ensures that permissions are always up to date and that security is safeguarded.
Read more about the KS Fiks platform here: https://ksdigital.no/tjenestene/fiks-plattformen/
eADM KS Fiks integration setup
Identum eADM provisions users and groups into Fiks sentralisert brukerstyring over SCIM 2.0. eADM is the IDM source — the same role Entra ID would have in KS's standard setup. You do not configure SCIM provisioning in Entra for Fiks when using eADM.
Terminology
|
Term |
What it is |
|---|---|
|
Fiks forvaltning |
The administration portal at forvaltning.fiks.ks.no. Used to register the SCIM source (Brukeradministrasjon) and to open Fiks services such as Fiks Register under Konfigurasjon → Tjenester. |
|
Sentralisert / ekstern brukerstyring |
SCIM-based user and group sync from your IDM (eADM) into Fiks forvaltning. KS docs: https://developers.fiks.ks.no/felles/ekstern-brukerstyring/index.html. |
|
Fiks Register |
The folkeregister service on the Fiks platform (Konfigurasjon → Tjenester → Fiks Register in Fiks forvaltning). Roles, dataminimering, and employee access via Tilganger til nettside for søk. KS docs: https://ksdigital.no/tjenestene/fiks-register/rolle-i-fiks-forvaltning-for-fiks-register/, https://ksdigital.no/tjenestene/fiks-register/fiks-folkeregister/. |
What eADM does vs what you do in Fiks
|
eADM (Identum) |
Your Fiks administrator |
|---|---|
|
Sync users (with fødselsnummer/D-nummer from HR) |
Fiks forvaltning: register SCIM source (Part 1) |
|
Sync groups and membership (if configured) |
Fiks Register: create roles and assign synced groups to roles — https://ksdigital.no/tjenestene/fiks-register/rolle-i-fiks-forvaltning-for-fiks-register/ |
You log in to Fiks forvaltning for both, but SCIM setup and Fiks Register role setup are different tasks in different menus.
Identum does not create Fiks Register roles or assign groups to roles.
Part 1 — Required: SCIM source in Fiks forvaltning
These steps are required for any eADM sync to Fiks.
Step 1: Register external source and generate token
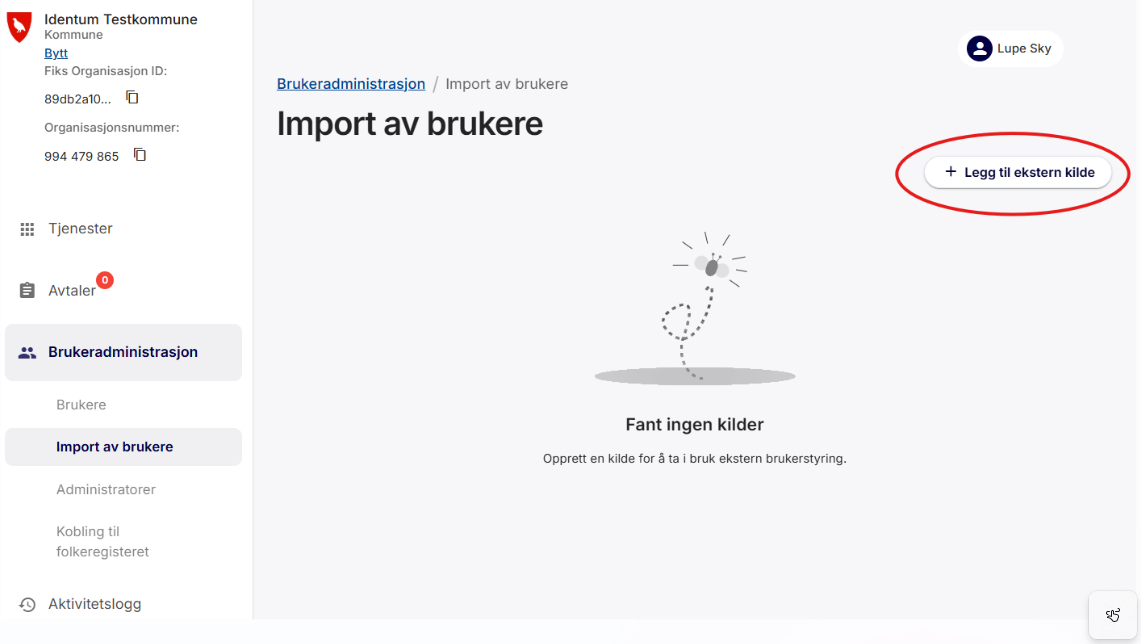
Where: Fiks forvaltning → Brukeradministrasjon → Import av brukere
To allow eADM to provision users, generate a SCIM token in Fiks forvaltning.
-
Log in to forvaltning.fiks.ks.no with Bank-ID.
-
Navigate to Brukeradministrasjon → Import av brukere.
-
Click + Legg til ekstern kilde.
-
Select Entra ID / Azure AD, enter any value as the tenant ID (see Note below), and copy the token before closing the window.
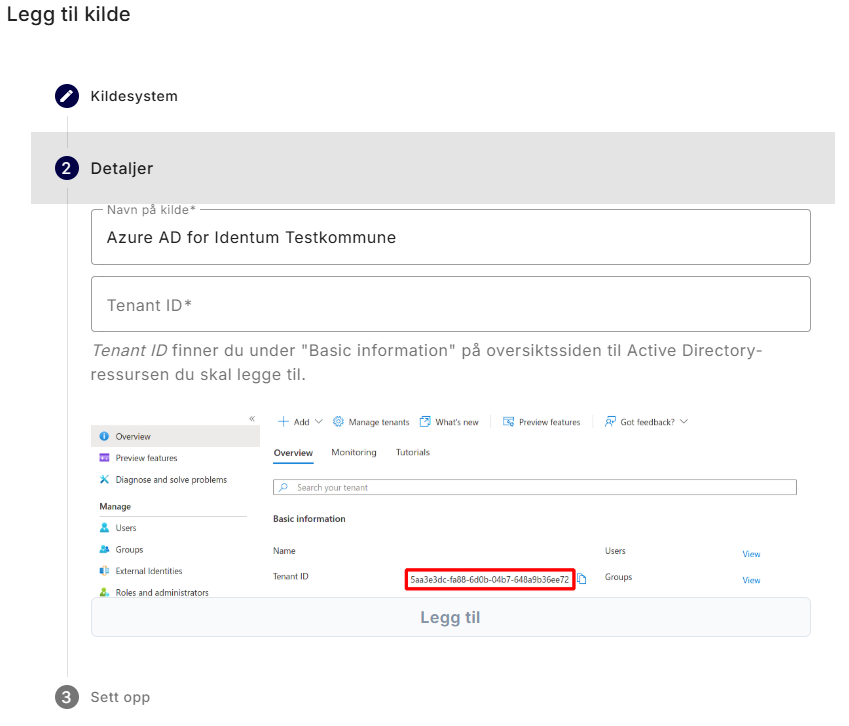
Note: You must select Entra in the UI dropdown, but eADM — not Entra — will push data to the SCIM endpoint. The tenant ID value does not affect the eADM integration.
-
Copy the SCIM endpoint URL and token. Send the token to your Identum contact through a secure password-sharing service.
KS reference: https://developers.fiks.ks.no/felles/ekstern-brukerstyring/kom-i-gang/index.html
Step 2: Send Identum the necessary information
Where: Customer → Identum (outside Fiks)
Send Identum:
-
Token (and SCIM endpoint URL if not already included) from Step 1
-
Whether you have existing users in Fiks today, and how they were created:
-
Previously synced from Entra ID — note if UPN in Entra mapped to userName in Fiks (https://ksdigital.no/tjenestene/ks-kunnskap/slik-flytter-vi-til-ks-kunnskap/teknisk-informasjon/sentralisert-brukerstyring/#endre-2)
-
Manually created — note if users have fødselsnummer in Fiks or UPN in the username field
-
-
Preferred login method for synced users: Entra ID, ID-porten, or both (default: both)
-
Whether you need group export for Fiks Register access (see Part 3), or user sync only
Important: If you currently provision users to Fiks from Entra ID, that integration must be disabled before eADM production export starts.
Part 2 — Required: eADM configuration and go-live
These steps are required for any eADM sync to Fiks. Identum performs the eADM work; you review and approve cutover.
Step 3: Identum configures and tests eADM export
Where: eADM (Identum)
After receiving your token and context from Step 2, Identum will:
-
Add and configure the KS Fiks sync step in your eADM sync cycle
-
Set up user export templates (and group templates if you use Part 3)
-
Run a test export and share results for your review
-
Agree a go-live date with you
eADM imports fødselsnummer/D-nummer from your HR source and sends it to Fiks as required for ID-porten login in Fiks forvaltning. You do not need to supply this separately.
SCIM field reference: https://developers.fiks.ks.no/felles/ekstern-brukerstyring/brukere-og-grupper/index.html
Note: https://developers.fiks.ks.no/felles/ekstern-brukerstyring/index.html is a separate product. KS recommends a separate SCIM sync for KS Kunnskap if all employees need access there. The eADM Fiks sync described here does not replace that unless explicitly configured.
Step 4: Go-live
Where: eADM (Identum) + Fiks forvaltning (coordinate)
-
Identum activates the KS Fiks sync step on the agreed date.
-
Users (and groups, if configured) begin syncing from eADM to Fiks forvaltning.
-
Verify synced users appear as expected in Fiks forvaltning.
If you only need user sync and will assign Fiks Register access manually (without groups), Part 3 below does not apply. You may still assign individual users to roles under Tilganger til nettside for søk in Fiks Register — see https://ksdigital.no/tjenestene/fiks-register/rolle-i-fiks-forvaltning-for-fiks-register/.
Part 3 — Optional: Group-based access in Fiks Register / Fiks folkeregister
Use this part if you want sentralisert brukerstyring to control who can use Fiks Register (and similar Fiks services) via groups, not only to maintain a user catalogue in Fiks.
When complete:
-
eADM owns group membership
-
Your Fiks administrator owns roles and group-to-role mapping in Fiks Register
Skip Part 3 if you only need users synced to Fiks and will manage Fiks Register access manually (adding individual users per role).
Step 5: Define access groups
Where: Planning (customer with Identum or partner)
Decide which groups eADM should export. Each group should represent one access package — the same Fiks Register role(s) and purpose.
Agree with Identum:
-
Group names (human-readable; exported as SCIM displayName in Fiks)
-
Membership rules in eADM
-
Which Fiks Register role(s) each group should map to (configured in Fiks Register — Step 8)
You can define groups yourself or ask Identum to build them.
Step 6: Create export groups in eADM
Where: eADM (customer or Identum)
If you create the groups in eADM yourself:
|
Field |
Guideline |
|---|---|
|
Description |
Human-readable name — exported as group displayName in Fiks. Must match what your Fiks admin expects when assigning groups to roles. |
|
SourceID / Name |
Stable technical id, e.g. |
|
Parent (Underlagt) |
Must be |
Notify Identum when groups are ready so export templates can be connected.
Group membership is always maintained in eADM. KS does not support hierarchical groups in SCIM — https://developers.fiks.ks.no/felles/ekstern-brukerstyring/brukere-og-grupper/index.html.
Step 7: Create roles in Fiks Register
Where: Fiks forvaltning → Konfigurasjon → Tjenester → Fiks Register → Roller
Create the Fiks Register role(s) you need (tjenesteområde, dataminimering, bruksområde). Identum does not perform this step.
Follow KS step-by-step instructions:
Step 8: Assign groups and activate sentralisert brukerstyring on roles
Where: Fiks forvaltning → Konfigurasjon → Tjenester → Fiks Register → role → Tilganger til nettside for søk
After eADM has synced users and groups (Part 2), and roles exist (Step 7), your Fiks administrator enables sentralisert brukerstyring for Fiks Register by assigning synced groups to each role.
At a high level:
-
Open the role in Fiks Register.
-
Go to Tilganger til nettside for søk.
-
With sentralisert brukerstyring active, choose groups from eADM (not individual users).
-
Verify that expected users have access via group membership in eADM.
This is where employee access to Fiks Register moves from manual user assignment to group-based access from eADM. KS describes this under https://ksdigital.no/tjenestene/fiks-register/rolle-i-fiks-forvaltning-for-fiks-register/.
Warning — Migrering til ekstern brukerstyring: When you enable ekstern brukerstyring in Fiks Register, Fiks shows a dialog titled Migrering til ekstern brukerstyring. If roles already exist for your organisation, activating will remove all existing role access (manual user assignments on those roles). Use Last ned oversikt over eksisterende rolletilganger in the dialog to save a reference before you click Aktiver ekstern brukerstyring.
Do not activate until groups and membership are synced from eADM and you have planned cutover with your Identum contact.
KS explains what this change means — employee access moves from Fiks Register to your IDM (eADM) via groups: https://ksdigital.no/tjenestene/fiks-register/fiks-folkeregister/, https://ksdigital.no/tjenestene/fiks-register/rolle-i-fiks-forvaltning-for-fiks-register/.
Before switching a role to group-based access:
-
Do not change roles that are still in active use without planning cutover.
-
Coordinate timing with your Identum contact so groups and membership are synced first.
Important: Group membership changes are made in eADM, not in Fiks Register. Fiks Register only links synced groups to roles.
Background: https://ksdigital.no/tjenestene/fiks-register/fiks-folkeregister/
Quick reference — who does what
|
Task |
Where |
Owner |
|---|---|---|
|
Register SCIM source, generate token |
Fiks forvaltning |
Customer (Fiks admin) |
|
Send token and context to Identum |
— |
Customer |
|
Configure eADM sync, test export, go-live |
eADM |
Identum |
|
Define access groups and eADM rules |
eADM |
Customer + Identum/partner |
|
Create export groups in eADM |
eADM |
Customer or Identum |
|
Create Fiks Register roles |
Fiks Register (via Fiks forvaltning) |
Customer (Fiks admin) — https://ksdigital.no/tjenestene/fiks-register/rolle-i-fiks-forvaltning-for-fiks-register/ |
|
Assign synced groups to roles (sentralisert brukerstyring) |
Fiks Register → Tilganger til nettside for søk |
Customer (Fiks admin) — https://ksdigital.no/tjenestene/fiks-register/rolle-i-fiks-forvaltning-for-fiks-register/ |
|
Maintain group membership |
eADM |
Customer (eADM rules) or Identum/partner |
Document map
|
Part |
Required? |
Scope |
|---|---|---|
|
Part 1 — Fiks forvaltning: SCIM source |
Yes |
Steps 1–2 |
|
Part 2 — eADM configuration and go-live |
Yes |
Steps 3–4 |
|
Part 3 — Fiks Register group access |
Only if using group-based access |
Steps 5–8 |